Table of Contents
Blogger Robots.txt Generator Tool
Works with both, .blogspot.com and custom domains.
Enter your Blogger blog’s address (URL) below. [Including https:// and www. (if custom domain)]
What Is Robots.txt And How Is It Useful For Blogger (BlogSpot)?
Robots.txt is a text file which helps the bots/crawlers of the search engines such as Google and Bing to crawl and index your site effectively.
It is a set of instructions or rules, which the crawlers and search engine bots visiting your site, follow.
The Robots.txt file is also used by crawlers from other types of websites such as social media sites like Facebook, Twitter and SEO sites like online keyword research tools.
The main function of the Robots.txt file is to guide the crawlers and the bots, about which portion of your site should be available on the search engines and which parts should not show up on the search.
For example, a blogger would want all her/his articles to show up on the search engine, but would definitely not want other pages like the blog’s internal search pages to show up on Google!
Let’s consider a scenario:
Suppose a person visits your website and uses the search bar on your site to look up a random word unrelated to the niche of your website.
He/she might end up with something like this:

And in Blogger, the URL of that page will be: https://www.example.com/search?q=hallelujah
What will happen next is, the crawler in the background will most probably crawl this search results page as well and put it in its index. And due to that, these low-quality pages that will eventually get stored in Google’s index will affect the authority of the blog.
Here’s an example:
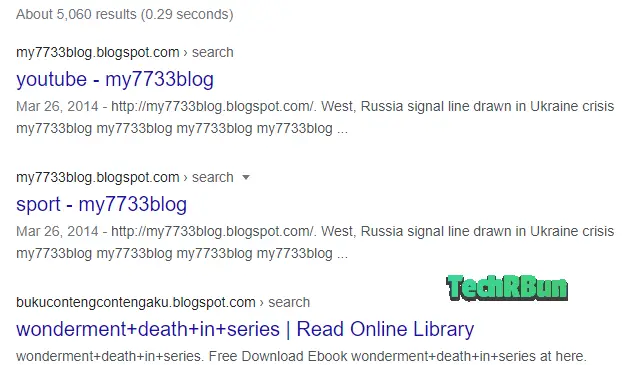
But with Robots.txt file present, it will instruct the web crawlers not to put such pages in their index and thus, preventing the indexing of such low-quality pages.
Thus, Robots.txt helps the crawlers avoid the unimportant pages on your blog and rather concentrate on the important areas, thus boosting your SEO (Search Engine Optimisation) considerably.
How To Use The Custom Robots.txt Generator For Blogger?
Generate Custom Robot.txt
Simply enter your Blogger site’s URL along with https:// and www. in the above tool and press the “Generate Robots.txt” button.
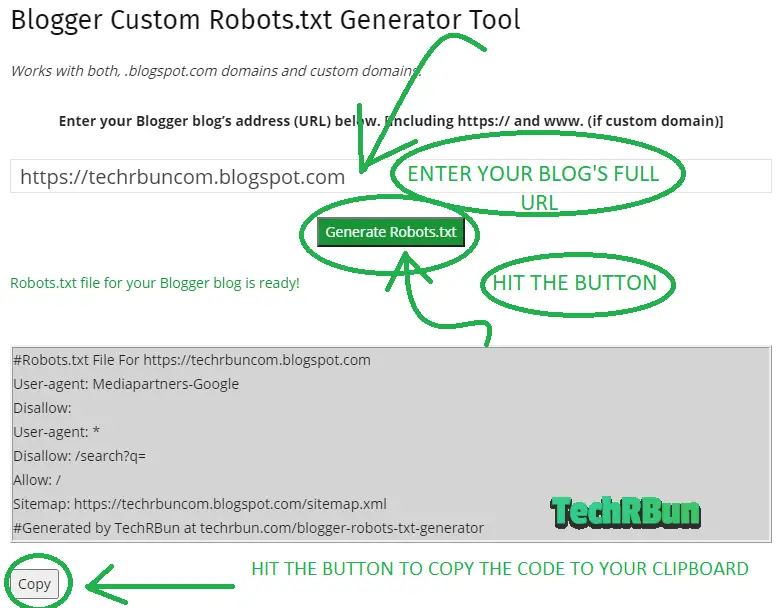
Now hit the “Copy” button. The Robots.txt code for you Blogger blog will now be copied in your clipboard.
Submit Custom Robot.txt To Blogger
Now login to your Blogger account.
Then go to Settings and scroll down to Crawlers and indexing (NEW INTERFACE)
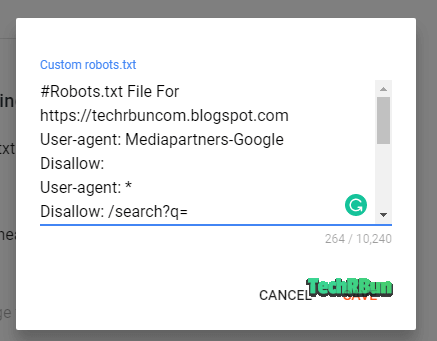
Turn on “Enable custom robots.txt” and click on “Custom robots.txt“

Now paste the robots.txt code using CTRL+V on Windows or Command+C on Mac.
Hit the “Save” button.
OR
Go to Settings -> Search Preferences -> Crawlers and indexing. (OLD INTERFACE)
And click on Edit
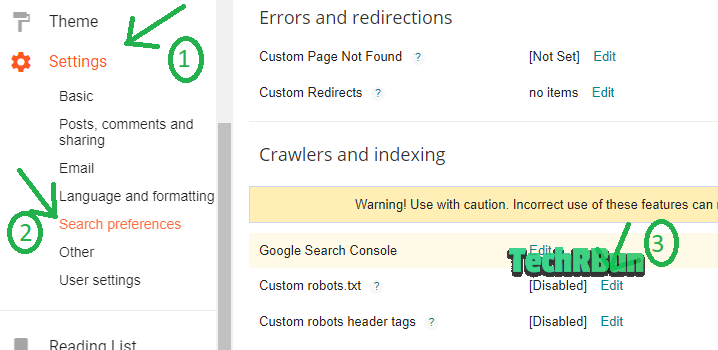
Now set “Enable custom robots.txt content?” to “Yes“.
Paste the robots.txt code that you copied from my Blogger Robots.txt generator tool, inside the box and click on “Save changes“.

That’s it!
Congratulations!
You have successfully submitted the custom robots.txt file to your Blogger blog!
Custom Robots Header Tags
Along with custom robots.txt, Blogger also provides you with the option to set specific rules for web crawlers for individual page types (homepage, archive, search, posts and pages) with custom robots header tags.
Here’s how you can setup the Custom Robots Header Tags with the optimal settings:
NEW INTERFACE
Turn on the “Enable custom robots header tags” option, which you will find just under the “Custom robots.txt” option.

Then click on Home page tags and configure it as shown below in the screenshot.
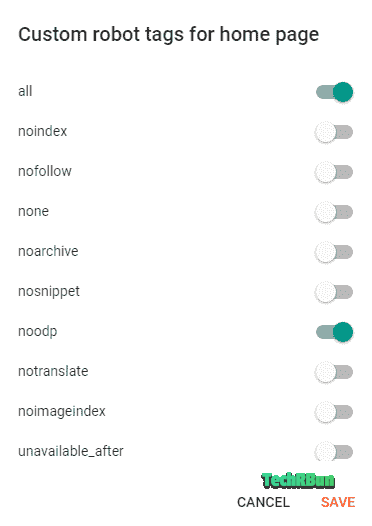
Hit the SAVE button.
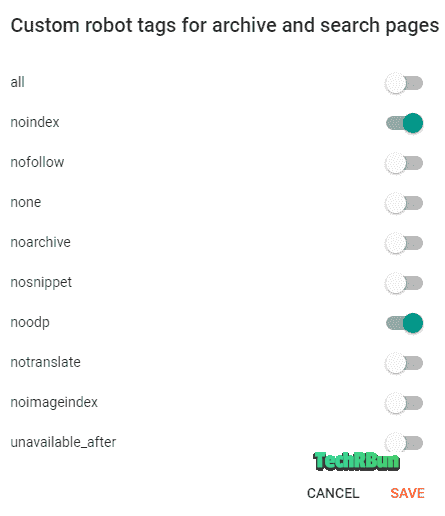
Next click on “Archive and search page tags” and configure it as shown below and hit SAVE.
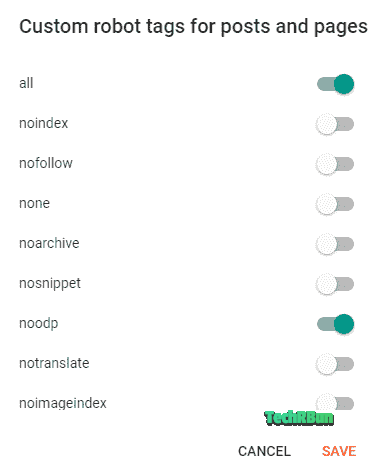
Finally, configure the “Post and page tags” and save it.
OLD INTERFACE
In the old (legacy) interface of Blogger, you will find the “Custom robots header tags” just after the “Custom robots.txt” option.
Click on the edit button next to the “Custom robots header tags” option and configure it as shown in the screenshot below:
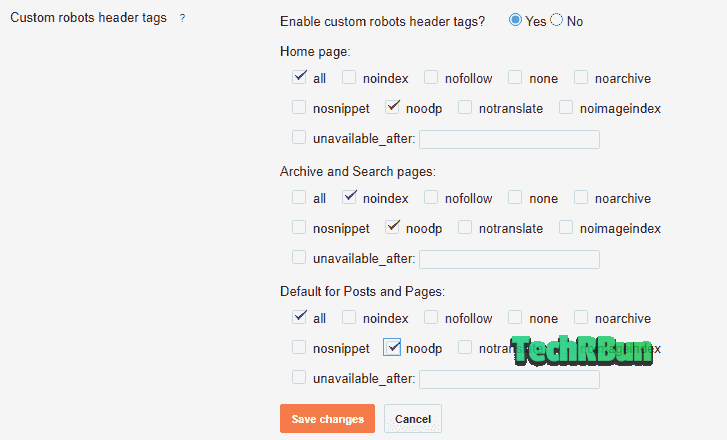
Click on Save changes.
That’s It!
Don’t forget to share this article on your favourite social media if you liked it. Feel free to comment down below if you have any confusions or doubts.
Talk to you again, soon. Have a great day ahead!




can you share the custom robot header tags setting
Hi Ali!
Thank you for your suggestion. I have updated the article with the custom robots header tags settings.
Great website and wonderful information. God bless you. I just shared your page and that deserves it to be spread to all. thanks.
Glad you liked it! 🙂
I have applied to my blog. Thank you very much
The robo.txt generator was very helpful.
I have tried many sitemap generator but this sitemap is the best. Thank you.
I’m glad to hear that! 🙂
Good website…… Thanks
Thanks for this. I have applied it to my blog.
But I wanted to ask: In my generated Robots.txt above the sitemap URL ends with two forward slashes.
Like this: //sitemap.xml
Is that correct? Or a mistake with your generator?
Cheers.
There should be only one forward slash. This might have happened because you had included the trailing slash in the URL input box. Thanks for pointing out this issue. I will modify the generator to take care of this kind of issues in the future. For now, kindly use just a single slash, that is, /sitemap.xml
bro will we have to make changes in Google search console after this changes are made , or it will automatically remove those unnecessary indexed pages
It will automatically detect your new robots.txt file the next time Google crawls your site and then remove those unnecessary pages automatically.
thanks bro , Can you please share your Instagram ?
I do not use instagram, Hussain. I only use twitter @anirbanroy2002 🙂
thanks bro
Thank you so much for this tutorial. It really helped me.
Does this crawl for all posts(ex 4000 blog posts) on the blog.
Yes! It links to your blog’s sitemap which should contain entries for all your posts.
Thank you for building this amazing tool and the screenshots for setting up the header robots tags for blogger. Appreciate it.