Are you tired of your Roomba vacuum cleaner abruptly stopping its cleaning cycle after just a few minutes—perhaps around 5 minutes—of operation? Trust me, I’ve been there too. It’s incredibly frustrating to rely on a handy robotic cleaner only to have it come to a sudden halt, leaving your floors unfinished and your cleaning plans disrupted. However, fear not! As a Roomba user who has personally encountered and successfully resolved this very issue, I understand the annoyance it can bring.
In this article, I will guide you through the steps to diagnose and fix the problem of your Roomba stopping after working for only a few minutes.
By addressing the common causes and implementing the right solutions, you can restore your Roomba’s functionality and enjoy uninterrupted cleaning sessions once again.
We all know how valuable our time is, and having a reliable Roomba that operates smoothly for more than just a few minutes can significantly contribute to our productivity and peace of mind. Therefore, it’s essential to take the necessary troubleshooting measures to overcome this obstacle.
The first step in resolving this issue is to identify the potential causes behind your Roomba’s unexpected shutdowns. By understanding the root causes, which we’ll discuss shortly, you can target the specific problem area and apply the appropriate fix.
Remember, with a little patience and perseverance, you can regain the efficient cleaning performance you expect from your Roomba. So, let’s dive in and unravel the secrets to overcoming this frustrating obstacle together. Your spotless floors await!
Table of Contents
Understanding The Issue: Why Roomba Might Stop Working Only After A Few Minutes
Having your Roomba stop working after just a few minutes can be frustrating, but there are several common reasons why this issue might occur. Understanding these potential causes will help you identify the specific problem you’re facing and take appropriate steps to fix it.
Let’s explore some of the most common factors that can lead to a Roomba stopping prematurely.
Battery Life
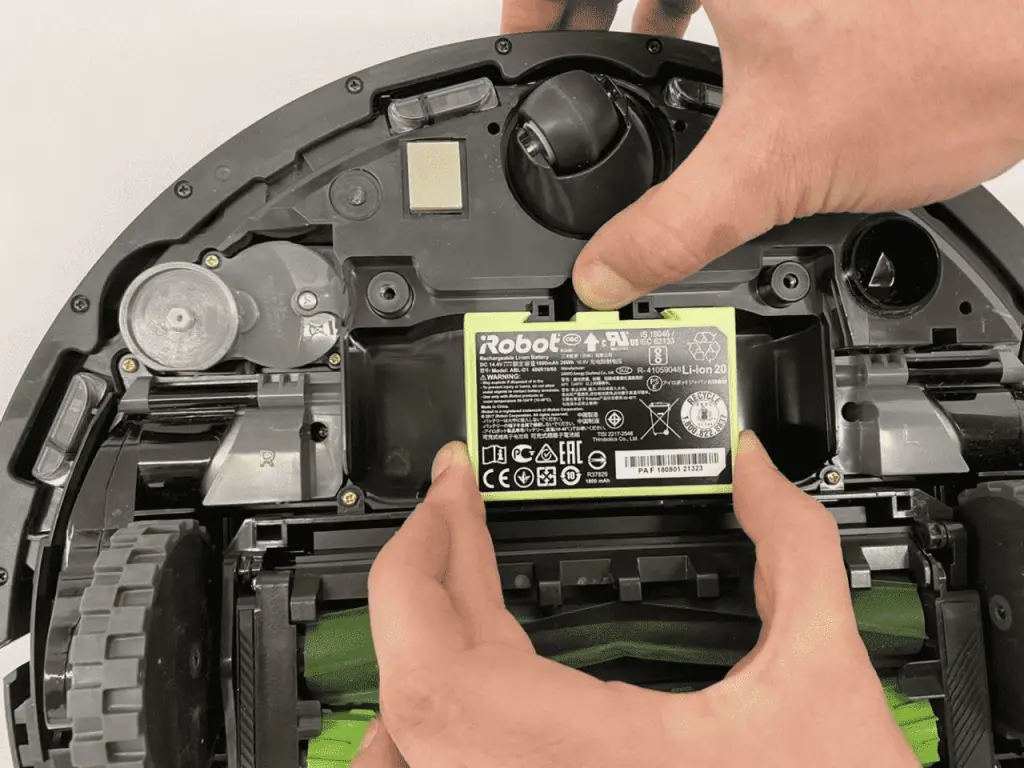
One of the primary culprits behind a Roomba’s short operational time is a low battery. If your Roomba hasn’t been charging properly or if the battery is old and no longer holds a charge effectively, it can result in limited cleaning cycles. When the battery charge drops below a certain threshold, the Roomba will automatically stop to conserve power. Checking and addressing battery-related issues is a crucial step in resolving this problem.
Example Scenario: You notice that your Roomba stops after only a few minutes of cleaning, and the power light blinks red. This indicates a low battery. Make sure to check the charging dock and connections to ensure they are working properly. If the issue persists, consider replacing the battery.
Dirty Sensors
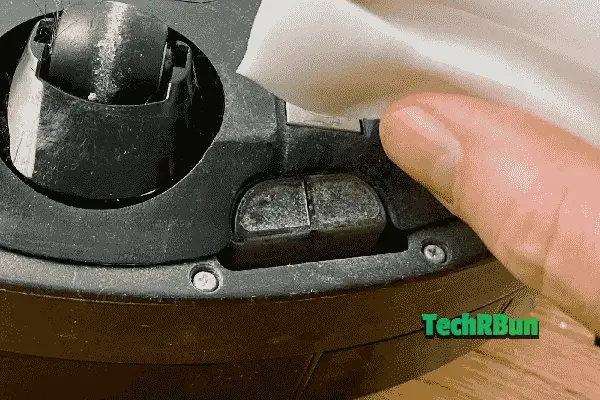
Roombas rely on various sensors to navigate your home, avoid obstacles, and detect dirty areas that require more attention. When these sensors become dirty or obstructed, they may fail to function correctly, causing the Roomba to stop unexpectedly. Dust, pet hair, and debris can accumulate on the sensors, interfering with their ability to detect walls, furniture, or virtual barriers.
Example Scenario: Your Roomba starts cleaning but stops abruptly, even though there are no visible obstacles in its path. Check the sensors, particularly the front bumper and cliff sensors, for any dirt or debris. Clean them carefully using a soft cloth or cotton swab to ensure they are free from obstructions.
Tangled Brushes
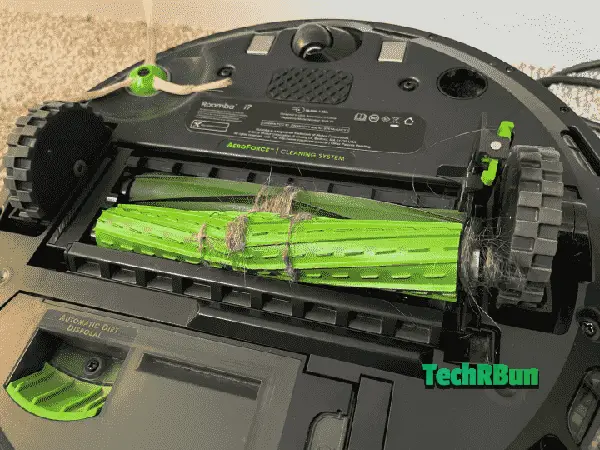
Roombas use rotating brushes to sweep and agitate dirt and debris from your floors. Over time, these brushes can become tangled with hair, thread, or other debris, which can impede their movement. When the brushes get tangled, the Roomba’s motor may struggle, causing it to stop as a safety measure.
Example Scenario: You notice that your Roomba starts and runs for a few minutes but then abruptly stops. Inspect the brush compartment for any entangled hair or debris. Remove the brush assembly and carefully untangle any obstructions. Regularly cleaning the brushes will help prevent this issue from occurring.
Obstructed Wheels
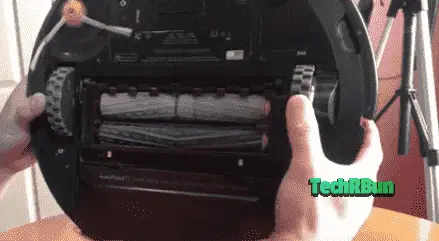
Roombas have wheels that allow them to move freely across different floor surfaces. If these wheels become obstructed by debris, such as hair or string, the Roomba’s mobility will be compromised, leading to frequent stops.
Example Scenario: Your Roomba seems to be struggling to move and stops after a short period of cleaning. Flip the Roomba over and inspect the wheels for any trapped debris. Remove any obstructions carefully and ensure that the wheels can rotate smoothly.
By understanding these common causes, you can now begin troubleshooting the specific issue affecting your Roomba.
In the next sections, we will discuss practical solutions to address each problem, allowing you to restore your Roomba’s functionality and enjoy uninterrupted cleaning sessions. Don’t worry; there’s a fix for every issue!
Steps To Troubleshoot A Roomba That Stops Only After A Few Minutes
To resolve the issue of your Roomba stopping after working for only a few minutes, follow these step-by-step troubleshooting tips.
By systematically addressing each potential problem, you can identify the underlying issue and take appropriate corrective measures. Let’s dive in:
Step 1: Check the Battery Charge
The first step is to ensure that your Roomba has sufficient battery power to complete a cleaning cycle. Here’s how you can do that:
- Place your Roomba on the charging dock and ensure that it is properly connected.
- Look for the battery indicator on the Roomba. If it displays a solid green light, the battery is fully charged. A blinking red light indicates a low battery.
- If the battery is low, allow the Roomba to charge for at least 3 hours or until the battery indicator displays a solid green light.
Note: If you consistently experience short battery life, it may be time to replace the battery.
Here’s an helpful guide: How to Replace the Battery of iRobot Roomba (All Models)
Step 2: Clean the Sensors
Dirty sensors can disrupt the Roomba’s navigation and cause it to stop prematurely. Follow these instructions to clean the sensors:
- Locate the sensors on your Roomba. They are usually located on the front bumper and underneath the unit.
- Gently wipe the sensors with a soft cloth or use a cotton swab to remove any accumulated dirt, dust, or debris.
- Pay special attention to the cliff sensors, which detect drop-offs or stairs. Ensure they are clean and unobstructed.
Note: Refer to your Roomba’s user manual for the exact sensor locations on your specific model.
Step 3: Clear Tangled Brushes
Tangled brushes can impede the Roomba’s movement and cause it to stop. Follow these steps to clear any obstructions:
- Turn off the Roomba and flip it over, exposing the brush compartment.
- Remove the brushes from their housing by following the instructions in your Roomba’s user manual.
- Carefully untangle any hair, thread, or debris wrapped around the brushes.
- Clean the brush compartment using a brush or a cloth to remove any residual debris.
- Reassemble the brushes and ensure they are securely in place.
Step 4: Inspect and Clean the Wheels
Obstructed wheels can hinder the Roomba’s mobility. Here’s how you can inspect and clean the wheels:
- Flip the Roomba over and examine the wheels for any trapped debris.
- If you notice any obstructions, gently remove them using your fingers or a pair of tweezers.
- Clean the wheels and axles using a damp cloth to remove dirt or grime.
Step 5: Reset the Roomba
Sometimes, performing a reset can help resolve minor issues. Follow these steps to reset your Roomba:
- Press and hold the “Clean” button on the Roomba for about 10 seconds.
- Release the button when you hear a tone, indicating that the reset is complete.
- Allow the Roomba to restart and then initiate a new cleaning cycle.
Note: Resetting the Roomba will not erase any saved settings or schedules.
Step 6: Test in a Different Area
If the issue persists, try moving the Roomba to a different area of your home and observe its performance. Sometimes, specific environmental factors or obstructions in a particular area can cause the Roomba to stop prematurely. By testing it in a different location, you can determine if the issue is specific to that area or more widespread.
Additional Tips:
- Regularly clean the Roomba’s brushes, sensors, and wheels to prevent future issues.
- Avoid running the Roomba on excessively thick carpets or rugs, as this can strain the motor and drain the battery quickly.
- Consider scheduling regular maintenance and cleaning sessions for your Roomba to keep it in optimal condition.
Remember, each troubleshooting step is designed to address a specific problem that may be causing your Roomba to stop prematurely.
By systematically going through these steps, you can identify and resolve the underlying issue. Enjoy the convenience of a Roomba that operates smoothly and completes its cleaning cycles without interruptions!
Advanced Solutions and Maintenance Tips
If your Roomba vacuum cleaner still continues to stop after only a few minutes of operation, there are several advanced solutions and maintenance tips you can implement to address the issue.
In this section, we will explore less common but potential causes such as software glitches or connectivity problems, as well as provide detailed instructions on how to resolve them.
Additionally, we will discuss the significance of regular cleaning and maintenance to prevent performance issues and extend the life of your Roomba. Follow these comprehensive steps to troubleshoot and maintain your Roomba effectively.
Software Update

Software glitches can occasionally cause unexpected behavior in your Roomba. To ensure optimal performance, it is essential to perform a software update to ensure your Roomba has the latest firmware and bug fixes.
Follow these steps to update the software:
- Ensure your Roomba is fully charged or connected to the charging dock.
- On your smartphone or tablet, download the latest version of the Roomba app from the respective app store.
- Open the Roomba app and follow the on-screen instructions to connect it to your Roomba.
- Once connected, navigate to the settings or software update section within the app.
- Check for available software updates and follow the prompts to install them.
- During the update process, ensure that your smartphone or tablet is connected to a stable Wi-Fi network.
Connectivity Issues
If you encounter connectivity issues between your Roomba and the app or Wi-Fi network, addressing these problems can help resolve the recurring stopping issue.
Follow these troubleshooting steps:
- Ensure your Roomba is within range of your Wi-Fi network and that the signal strength is adequate.
- Verify that your smartphone or tablet is connected to the same Wi-Fi network you want to connect your Roomba to.
- Restart your Wi-Fi router and wait for it to fully reboot before attempting to reconnect your Roomba.
- Restart your smartphone or tablet to refresh its network settings.
- Open the Roomba app and carefully follow the instructions to reconnect your Roomba to the Wi-Fi network.
For more specific instructions on troubleshooting connectivity issues, refer to the Roomba app’s user guide or visit the manufacturer’s website for your particular Roomba model.
Regular Cleaning and Maintenance
Proper cleaning and maintenance are essential for ensuring your Roomba’s optimal performance.
Follow these steps to maintain your Roomba effectively:
Deep Cleaning the Components
Regularly deep clean the following Roomba components to prevent debris buildup and maintain peak performance:
Dustbin:
- After each cleaning cycle, remove the dustbin from your Roomba.
- Dispose of the collected debris in a trash bag.
- Clean the dustbin by wiping it with a damp cloth or rinsing it with water.
- Ensure the dustbin is completely dry before reinserting it into your Roomba.
Filter:
- Depending on your Roomba model, tap the filter against a trash can or rinse it with water (if it’s a washable filter).
- Allow the filter to dry completely before reinserting it into your Roomba.
Extractors:
- Remove the extractors from your Roomba.
- Use a tool or brush to remove any tangled debris or hair.
- Rinse the extractors with water if necessary and ensure they are completely dry before reinstalling them.
Maintenance of Essential Parts

Regularly inspect and maintain the following essential Roomba parts:
Brushes:
- Remove the brushes from your Roomba.
- Clean them thoroughly using a tool or brush to remove tangled hair and debris.
- If the brushes are worn or damaged, consider replacing them with genuine Roomba replacement brushes for optimal performance.
Sensors:
- Carefully clean the sensors on your Roomba using a soft cloth or cotton swab.
- Ensure there are no obstructions or debris blocking the sensors.
Additional Maintenance Tips
Consider the following additional maintenance tips to keep your Roomba in excellent working condition:
- Store your Roomba in a cool, dry place away from direct sunlight when not in use.
- Avoid storing your Roomba on its charging dock for extended periods as it may lead to battery deterioration.
- Keep your Roomba away from large cords, loose rugs, or objects that may tangle the brushes or hinder its movement.
- Regularly check your home’s layout to ensure it allows for smooth navigation and minimal physical obstacles.
Reliable Sources for Replacement Parts and Accessories
When purchasing replacement parts or accessories for your Roomba, it is important to rely on reliable sources.
You can use the tool given below to find genuine parts and accessories for Roomba.
To use the tool, perform the following steps:
- Find your Roomba’s model number by turning it upside down and looking at its label.
- Enter the model number in the first field of the tool.
- Enter the name of the part or accessory that you’re looking for, in the second field of the tool.
- Press the “Find Accessory!” button.
Roomba Parts And Accessories Finder Online
By implementing these advanced solutions and following proper maintenance practices, you can effectively address the issue of your Roomba stopping prematurely and enjoy uninterrupted cleaning performance.
However, if you have followed all the troubleshooting steps and maintenance tips provided but the issue persists, it is advisable to contact Roomba’s customer support and seek professional assistance.
Contacting Customer Support

When all your troubleshooting attempts have been exhausted and your Roomba continues to stop after a few minutes of operation, it’s time to reach out to Roomba’s customer support.
Contacting customer support is an important step in resolving the issue and ensuring you receive the necessary assistance.
Here’s why it’s beneficial and how you can effectively reach out for help:
Specialized Assistance and Warranty Coverage: Roomba’s customer support is equipped with specialized knowledge and expertise to address complex issues. By contacting them, you can tap into their resources and guidance to resolve the problem. Additionally, if your Roomba is still under warranty, customer support can provide information on potential coverage for repair or replacement.
To contact Roomba’s customer support, you have several options available:
- Phone: You can reach iRobot’s customer care by dialing 1-866-747-6268 on your phone. Be prepared to wait on hold during peak hours.
- Email: Send a detailed email to [email protected] explaining the issue to the provided customer support email address. Ensure you include relevant details about your Roomba model and purchase information.
Gathering Relevant Information
Before contacting customer support, gather the following information:
- Roomba model number and serial number: These can usually be found on the bottom or side of your Roomba.
- Purchase details: Note down where and when you purchased your Roomba.
- Troubleshooting steps taken: Document the steps you have already attempted to troubleshoot the stopping issue.
Providing Detailed Information
When communicating with customer support, be prepared to provide a detailed description of the problem you are experiencing. If your Roomba displays any error codes or messages, note them down. This information will help the customer support representative assess the situation accurately.
Working with Customer Support
The typical process of working with customer support may involve the following steps:
- Initial diagnostics: Customer support may ask you some questions to understand the problem better and determine potential solutions.
- Troubleshooting guidance: They will provide you with specific troubleshooting steps to try, based on the information you provide.
- Repair or replacement options: If the issue persists, customer support will advise you on potential options for repair or replacement, especially if your Roomba is still under warranty.
Effective Communication with Customer Support
When interacting with customer support, keep the following tips in mind:
- Be patient: Understand that customer support representatives are working to assist you and may require time to find the best solution.
- Be courteous: Maintain a polite and respectful tone throughout your interactions.
- Keep records: Take notes of your conversations, including dates, names of representatives, and any instructions or recommendations provided.
Inquire about Warranty Coverage and Repair Options
Ask customer support about any warranty coverage that may apply to your Roomba. Inquire about repair options and whether any associated costs may be involved. This will help you make informed decisions regarding the next steps for resolving the issue.
Sharing Experience
Once you have resolved the stopping issue with the help of customer support, consider sharing your experience with others by commenting here below this article.
Remember, contacting customer support is an important step in addressing persistent issues with your Roomba. Their expertise and guidance can significantly contribute to resolving the problem and getting your Roomba back to its optimal functionality.
Conclusion
In this comprehensive guide, we have explored the common issue of Roomba vacuum cleaners stopping after working for only a few minutes. We began by understanding the possible reasons behind this problem, including factors like battery life, dirty sensors, tangled brushes, and obstructed wheels. We then provided step-by-step troubleshooting tips, such as checking the battery charge, cleaning the sensors, and ensuring the brushes are free from debris.
For more advanced solutions, we discussed performing a software update to address software glitches and troubleshooting connectivity issues with Wi-Fi or the smartphone app. We emphasized the importance of regular cleaning and maintenance, providing detailed instructions on deep cleaning the Roomba’s components and properly maintaining essential parts like brushes and sensors.
Furthermore, we highlighted the significance of contacting Roomba’s customer support when all troubleshooting attempts have been exhausted. We encouraged readers to gather relevant details, be prepared to provide a detailed description of the problem, and follow any instructions or recommendations from customer support.
In conclusion, addressing the issue of a Roomba stopping after a few minutes requires proactive troubleshooting and maintenance. By following the steps outlined in this article and promptly seeking assistance when needed, you can restore your Roomba’s functionality and enjoy uninterrupted cleaning performance.
Remember to share your experiences and provide feedback on the effectiveness of the solutions.
Lastly, maintain a well-functioning Roomba by regularly cleaning and maintaining its components, avoiding physical obstacles, and scheduling routine maintenance routines. With these practices in place, your Roomba will continue to be a reliable household companion.
I hope you found this article helpful. Feel free to comment down below if you have any queries, I’ll try my best to help you out.


